Pages

Thursday, April 14, 2011

Yoyo Projects

Today I want to write about fabric yoyo. It's very easy and fun to make but a very good embellishment for any project. Or, you can make project with just fabric yoyo such as brooch, table runner, sofa spread etc....whatever you can imagine. There are many tutorials on how to make fabric yoyo in the internet so I will not going to show you any here. But below are some links that you can click if you need a tutorial. -HeatherBailey -Zakkalife -Whipup OK.Back to my story. Below are some projects that I've made using Clover Yoyo Makers I've bought long time ago in Japan. Not that I'm too lazy to draw a circle whatsoever but with yoyo maker you can make precise size for your yoyo and also with a lot of design too. You need more imaginations and skills if you want to make flower yoyo or heart-shape yoyo or even butterfly-shape yoyo. Tomorrow I will upload all the yoyo that I have. 


Sample of fabric yoyo
 This yoyo brooch only took me 5 minutes to finish. Just sew the pearl and the pin.Done!! Wore it with my selendang and went off to work last week. I will upload the picture of me wearing this pin if I get the chance.


Yoyo Brooch


Yoyo Brooch - Back view
Mountain of Yoyos. But I think they lack of green and yellow. Got some green fabric scrap somewhere in my craftroom. Will add the collection if I can find it.


My Yoyo Collection.


Jar of happiness
 Some idea to make use of your yoyo.


Tissue cover


Flower Yoyo & Stiches


Small item tray, to be paired with tissue cover above.


The pair

Ok...need to get back to work...muahahahah....mengulor aje.

Mary Jane Slipper

Very easy yet sooo cute.
Must try project!!
The tutorial is from ohmygoodknits! but I modify slightly to fit my big chubby feet.
Here's the pictures.
The 1st.


The 2nd.

The 3rd.

With the heart-shape yoyo.

Tuesday, April 12, 2011

Jeans Recycle Bag

I've dreamed of having jeans recycle bag for so long and TODAY my dream comes true. This bag is quite bulky as I was using my old torn Ladylike jeans size 34. But overall I satisfied with the result. I didn't follow any pattern or tutorial just sewing as I go. Thanks to my NV50 as no needle broken whatsoever during the process.Here's the pictures.
Front view

I used drawstring idea for closure. Remark the handle...very solid and strong.

Inside view. No pocket as there are too many pockets outside.

Weird. But can be use as secret hiding place.

Back view. No comment : )
I think it is really fun to experiment with jeans as contrary that it is thick and difficult to sew. And it also good for hand sewing as I did it to attach the lining. My opinion, great project to test drive your sewing machine.Chao!!

Monday, April 11, 2011

Gathered Clutch

Just finished sewing 2 clutchs. I've made it from scrap fabrics given by my tailor sister.The exterior must be somebody "baju kurung" alike...hehe. The tutorial is by Noodlehead. Link to here

Still don't have the owner by I might give it to my sister as my expression of gratitude...wah...cam bagus jer and to my best friend who celebrated the birthday on January...hahaha...sorry baru skrg ada masa nak jahit...

See the pictures.

Front view.

Inside view with 3 card slots.

Inside view with 1 pocket.

Back view.
Adioss..

Simply Delicious Red Bean Buns

Hoyahoya...feeling eating red bean bun at the middle of the nite. And the result...yummy!!
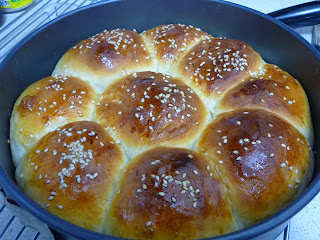

Gebuss...
This what you get when you do not equally divide  the ball...

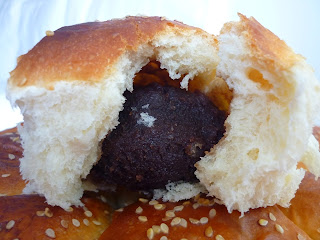
The inside...hohooya...
And the recipe is from MamaFaMi's blog. Sorry mama pasting here without your consent first.
Below is half from original recipe as what I've done. Made some modifications on how to do it. Let's bake!!


Ingredients :

100ml water
1 medium egg (Leave it some to brush on the bun)
45g castor sugar
1/4 teaspoon salt
1/2 tablespoon dough softener
250g high protein flour
2 tablespoons milk powder
1/2 tablespoon bread improver
5g instant dried yeast
1 1/2 tablespoons margarine (I used butter)
enough red bean paste
sesame seeds

Method :

1. Pour water, egg, sugar, salt and dough softener into the bread maker pan. Top it with flour, milk powder, bread improver, and yeast.
2. Set the bread maker to Dough function.
3. Once the dough is just combined, add in margarine. (I put the butter together with dry ingredients in Step 1).Leave the bread maker to continue doing it's job. This process will take about 1 1/2 hour including prooving.
4. Divide the dough into 10 equal portions. Form each dough into a ball and rest for 10 minutes.
5. Flatten the dough and place the red bean filling in the middle and wrap the filling with the dough. Arrange on a baking tray.
6. Cover the buns with damp cloth and let it rise until double in size (it takes another 30-40 min). Brush the buns with some egg wash and sprinkle with some sesame seeds..
7. Bake in a preheated oven at 180 C for 20 - 25 minutes or until golden brown.
8. Once out of the oven, brush with a bit of margarine butter. Place on a wire rack to cool. Keep in an airtight container.

Banana Choco Cupcake

Simple recipe for my future reference. Bake it before went to work last Saturday. The recipe is from Wild About Cupcakes from Rachel Lane but was altered a bit as the original using rum. It was my second time baking but the outcome is superb..gebu semacam je...maybe got to do with the "new bought" self-raising flour coz selalunye gune yg dah nak expired.. .So here it goes:

Cupcake
90  g     Cooking Chocolate
90  ml    Fresh Milk
150g     Self-raising Flour
2    tbs  Cocoa Powder
1/8 tsp  Salt
90  g     Butter
170g     Sugar
2           Large Eggs
2    tsp  Vanilla Essence
3           Medium size Banana

Chocolate Glaze
100g    Cooking Chocolate
2    tsp  Fresh Milk
2    tsp  Vanilla Essence

Steps
Cupcakes
Boil fresh milk. Remove from heat. Put cooking chocolate and let cool. Beat butter and sugar until creamy. Add eggs one at a time. Beat until smooth. With mixer at low speed, add dry ingredients,melted chocolate and vanilla essence.Stir the banana in by hand. Spoon into prepared cups.Bake for 20-25 minute with preheat oven at 180deg.

Chocolate Glaze
Put all into piping bag. Melt with boiled water. Spread the chocolate glaze on top of each cupcake and top with a slice of banana.

p/s: my colleague said it taste better than  Secret R...huhuhu...was it?

Sushi Zanmai @ Sunway Pyramid

Heaven!!
Sedap banget!!
The pictures shall tell the story.


Option 1: Nak makan sushi dan fulus no hal --> go to Sushi Zanmai
Option 2: Nak makan sushi tapi fulus buat hal --> go to Sushi King(20% discount weekday 2:00pm until 5:00pm.T&C apply). The salmon is quite big and thick but the rice slightly sweet.
Option 3: Nak makan sushi tapi nak makan banyak banyak banyak --> tunggu orang belanja...hehe.